Coding A DCOM Client
Gopalan Suresh Raj

Note
To work with any of these samples, you will need the following:
.........................................Microsoft Visual J++ ver 6.0

The Steps involved in developing the DCOM Client are

1. Add a new project StockDCOMClient to the StockDCOM project
2. Add COM wrapper of SimpleStocks to StockDCOMClient
3. Add code to Form1.java
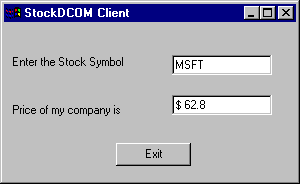
4. Build and run the client

1. Add a new project StockDCOMClient to the StockDCOM project
From Project Explorer | Solution | Add Project | Applications | Windows Application | Name: StockDCOMClient
From Project Explorer | StockDCOMClient | StockDCOMClient Properties | ClassPath uncheck the "Merge all Project-specific ClassPaths in solution" check box.

2. Add COM wrapper of SimpleStocks to StockDCOMClient
From Project Explorer | StockDCOMClient | Add | COM Wrapper check the checkbox listed with "SimpleStocks 1.0 Type Library".
Click "OK" to confirm list of COM Wrappers. Notice that the
stockmarketlib folder was created under the StockDCOMClient project.
Notice the java source files that have been generated:
StockMarket.java and IStockMarket.java.

3. Add code to Form1.java

Form1.java
import com.ms.wfc.app.*;
import com.ms.wfc.core.*;
import com.ms.wfc.ui.*;
import com.ms.wfc.html.*;

/**
 * This class can take a variable number of parameters on the command
 * line. Program execution begins with the main() method. The class
 * constructor is not invoked unless an object of type 'Form1' is
 * created in the main() method.
 */

public class Form1 extends Form {
 
  String editValue = null;
 
/**
   * TODO: make sure all your constructors/initialization code
   * paths have the following line:
   *   initForm();
   */

  public Form1() {
    // Required for Visual J++ Form Designer support
    initForm();

    // TODO: Add any constructor code after initForm call
  }

  /**
   * Form1 overrides dispose so it can clean up the
   * component list.
   *
   * TODO: have dispose call
   *   components.dispose();
   */

  public void dispose() {
    super.dispose();
    components.dispose();
  }

  private void edit1_Leave(Object source, Event e) {
    String editValue = edit1.getText();
    try {
      stockmarketlib.IStockMarket market = (stockmarketlib.IStockMarket)new stockmarketlib.StockMarket();
      String str = "$ "+market.get_price(editValue);
     
edit2.setText(str);
 
     
System.out.println( "The price of "+editValue+" is " + market.get_price(editValue) );
    }
    catch (com.ms.com.ComFailException exception) {
      System.out.println( "COM Exception:" );
    }

  }

  private void button1_click(Object source, Event e) {
    System.exit(0);
  }

  /**
   * NOTE: The following code is required by the Visual J++ form
   * designer.  It can be modified using the form editor.  Do not
   * modify it using the code editor.
   */

  Container components = new Container();
  Label label1 = new Label();
  Edit edit1 = new Edit();
  Label label2 = new Label();
  Edit edit2 = new Edit();
  Button button1 = new Button();

  private void initForm() {
    this.setText("StockDCOM Client");
    this.setAutoScaleBaseSize(new Point(5, 13));
    this.setClientSize(new Point(292, 157));

    label1.setLocation(new Point(8, 32));
    label1.setSize(new Point(136, 16));
    label1.setTabIndex(0);
    label1.setTabStop(false);
    label1.setText("Enter the Stock Symbol");

    edit1.setLocation(new Point(168, 32));
    edit1.setSize(new Point(100, 20));
    edit1.setTabIndex(1);
    edit1.setText("MY_COMPANY");
    edit1.addOnLeave(new EventHandler(this.edit1_Leave));

    label2.setLocation(new Point(8, 80));
    label2.setSize(new Point(128, 23));
    label2.setTabIndex(2);
    label2.setTabStop(false);
    label2.setText("Price of my company is");

    edit2.setLocation(new Point(168, 72));
    edit2.setSize(new Point(100, 20));
    edit2.setTabIndex(3);
    edit2.setText("$ 0.0");
    edit2.setReadOnly(true);

    button1.setLocation(new Point(112, 120));
    button1.setSize(new Point(75, 23));
    button1.setTabIndex(4);
    button1.setText("Exit");
    button1.addOnClick(new EventHandler(this.button1_click));

    this.setNewControls(new Control[] {
                        button1,
                        edit2,
                        label2,
                        edit1,
                        label1});
  }

  /**
   * The main entry point for the application.
   *
   * @param args Array of parameters passed to the application
   * via the command line.
   */

  public static void main(String args[]) {
    Application.run(new Form1());
  }
}

4. Build and run the client


click here to go to the
Developing DCOM Server Component from IDL...
click here to go to
My DCOM HomePage...

Go to the Component Engineering Cornucopia page

This site was developed and is maintained by Gopalan Suresh Raj

This page has been visited times since March 17,1999.

Last Updated : Mar 17, '99

If you have any questions, comments, or problems regarding this site, please write to me I would love to hear from you.


Copyright (c) 1997-99, Gopalan Suresh Raj - All rights reserved. Terms of use.

All products and companies mentioned at this site,are trademarks of their respective owners.