Developing
the Bank Checking MTS Server Component
Gopalan Suresh Raj
| Note |
| To
work with any of these samples, you will need the
following: .........................................Microsoft Visual J++ ver 6.0 .........................................Windows NT 4.0 Options Pack |
Once the IDL has been created, we now have to create the MTS server component.
The Steps involved in developing the MTS Server component are
1. Set the properties for your project
2. Implement the CheckingPK component
3. Implement the Checking Server component
3. Build and register the MTS server components
2. Add MTS aware code to the project's class
3. Mark the class as COM/MTS-enabled
4. Build the project
5. Deploy the DLL into The Microsoft Transaction Server
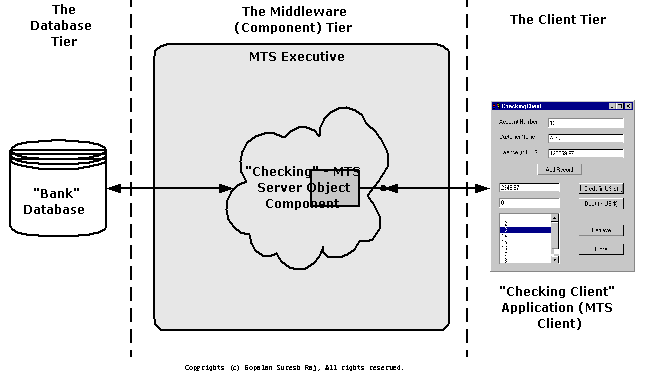
A Three Tier Architecture for a typical Bank Account

Figure shows what we are trying to ultimately accomplish in these pages
1. Create a new COM
DLL project
An MTS component should always be packaged as a DLL. Select New
Project and from the File menu, choose the COM DLL project
template in Visual J++. Name the project BankServer.
2. Set the
properties for your project
4. Set the properties for your project
1. ....From the Project Explorer | BankServer | BankServer Properties | ClassPath, uncheck the "Merge all Project-specific ........ClassPaths in solution" check box.
2. ....From the Project Explorer | BankServer | BankServer Properties | COM Classes check the "Use existing Type Library" ........radio button.
3..... Click the "Select" button.
4..... Click the "Browse" button.
5..... Browse to the newly created Bank.tlb file in the project directory.
6..... Select and open the Bank.tlb file.
7..... Click the "OK" button to confirm the list of COM Components.
8..... Click "OK" to confirm Bank Properties form changes.
9..... Notice that the Bank folder is added to the BankServer project.
10... Notice that 14 java source files have been created:
...... Checking.java, IChecking.java, and ICheckingDefault.java
...... ICheckingHome.java, and ICheckingHomeDefault.java
...... Savings.java, ISavings.java, and ISavingsDefault.java
...... ISavingsHome.java, and ISavingsHomeDefault.java
...... IAccountKey.java and IAccountKeyDefault.java
...... CheckingPK.java and SavingsPK.java
11... Rename the generated implementation class, Checking.java to CheckingImpl.java,
...... CheckingPK.java to CheckingPKImpl.java,
...... Savings.java to SavingsImpl.java and
...... SavingsPK.java to SavingsPKImpl.java.
12... A number of COM wrapper will be automatically generated during the compile phase.
3. Mark the class as
COM/MTS-enabled
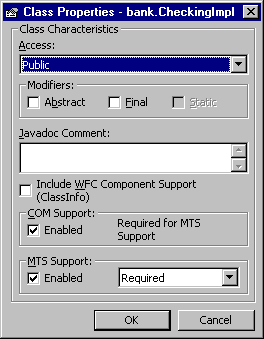
To deploy the class in MTS, you need to make it a COM/MTS class.
You can easily make it one by right-clicking the mouse on the
BankServer class from the Class Outline tab and Selecting Class
Properties. Mark the MTS Support as Enabled and say OK.

Figure : Mark the Class as
COM/MTS enabled
You will immediately notice that some code similar to this is added to the CheckingImpl class
/**
@com.register(clsid=07D690F5-FB95-11D2-97E3-006097A7D34F,
* typelib=07D690F0-FB95-11D2-97E3-006097A7D34F,
version="1.0")
* @com.transaction (required)
*/
The final code for the CheckingPKImpl
and CheckingPK looks like this:
| CheckingPKImpl.java |
| package bank; import
com.ms.com.*; /**
@com.register(clsid=07D690F4-FB95-11D2-97E3-006097A7D34F,
public
void setKey(int key) {
m_accountNumber = key; |
The Code for CheckingImpl.java is shown below:
| CheckingImpl.java |
| package
bank; import com.ms.com.*; /**
@com.register(clsid=07D690F5-FB95-11D2-97E3-006097A7D34F,
////////////////////////////////////////////////////////////////////
// Get the Object Context ////////////////////////////////////////////////////////////////////
// Get the Object Context //////////////////////////////////////////////////////////////////// //////////////////////////////////////////////////////////////////// case CheckingImpl.BALANCE_FIELD:
//////////////////////////////////////////////////////////////////// case CheckingImpl.BALANCE_FIELD:
case CheckingImpl.ALL_FIELDS:
//////////////////////////////////////////////////////////////////// |
4. Build the project
Select the Build menu and Build the project. This creates an MTS
component DLL called BankServer.dll. This contains the Class
files and all the appropriate stub code so that the DLL can be
registered and deployed in MTS.
5. Deploy the DLL into The
Microsoft Transaction Server
Start up the MTS Explorer. Go to the computer you want to install
your component on and select "Packages Installed".
Right click and create a New empty Package called BankServer.
Select the newly created BankServer package and create a New
Component. Select the Component through the Browse button into
MTS. (Make sure you Install New Component rather than Import
Components...) The Checking MTS Server component is now deployed
on MTS and is ready for client invocations.
| click here to go
to the Developing a Bank Account MTS Client Page... |
| click here to go to My MTS HomePage... |
This site was developed and is maintained by Gopalan Suresh Raj This page has been visited |
||
Last Updated : Apr 26, '99 |
||
Copyright (c) 1997-99, Gopalan Suresh Raj - All rights reserved. Terms of use. |
All products and companies mentioned at this site,are trademarks of their respective owners. |