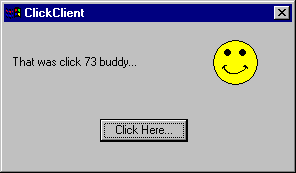
Figure : Shows the ClickClient MTS client program in action
Developing A Simple MTS Client
Gopalan Suresh Raj
| Note |
| To
work with any of these samples, you will need the
following: .........................................Microsoft Visual J++ ver 6.0 .........................................Windows NT 4.0 Options Pack |
The ClickClient counts and displays the number of times the User clicks on the "Click Here..." button during the lifetime of this client app. It uses the ClickServer to increment the count (Looks like our ClickClient client program is mathematically challenged :-) !!!!!!!!).
Figure : Shows the
ClickClient MTS client program in action
The Steps involved in developing the MTS Client are
1. Create a new Windows Application
2. Add COM Wrappers for the Java MTS Server Component
3. Add code in the Client to call the MTS Server
4. Build and Run the Client
1. Create a new
Windows Application
Create a Windows Application project in Visual J++ by selecting
the New Project in the File menu, then choosing the Windows
Application project template. Name the project ClickClient and
choose Open.
2. Add COM Wrappers
for the ClickServer Java MTS Component
Set up COM access to the Java Client App by adding COM wrappers
to the server component. From the Project menu, select Add COM
wrapper. Select the checkbox next to the ClickServer in the list
of installed COM components in the COM Wrappers dialog and press
OK. You will notice a package called ClickServer added to the
ClickClient project. Alternatively, if the ClickServer does not
show up on the list of registered COM wrappers, you always have
the option of browsing and selecting the DLL manually.
3. Add code in the
ClickClient to call the ClickServer Java MTS component
This is where we add code to the Client apps form to interact
with the Java MTS ClickServer component. Create a form similar to
the one shown.
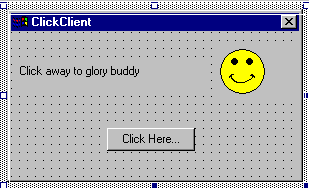
Figure : Shows the form that
we need to develop for our ClickClient program
Now add code to the generated
source. The code that needs to be added is highlighted in blue in
the figure below. Specifically, we need code to import the
ClickServer package
import
clickserver.*;
Add a member to cache the
Click Count on the client side
int
clickCount = 0;
Add code to the button1_click method so that the server is invoked from the
client whenever the button is pressed
private
void button1_click(Object source, Event e) {
ClickServer_Dispatch
server = (ClickServer_Dispatch)new ClickServer();
clickCount = server.Increment(clickCount);
String clickDisplay = "That was click
"+clickCount+ " buddy...";
label1.setText(clickDisplay);
}
The completed code is shown below:
| Form1.java |
| import com.ms.wfc.app.*; import com.ms.wfc.core.*; import com.ms.wfc.ui.*; import com.ms.wfc.html.*; import clickserver.*; /** int
clickCount = 0;
// TODO: Add any constructor code after initForm call /**
private
void button1_click(Object source, Event e) { /**
private
void initForm() {
IResourceManager resources = new ResourceManager(this,
"Form1");
label1.setLocation(new Point(8, 32));
button1.setLocation(new Point(96, 96));
pictureBox1.setLocation(new Point(208, 16));
this.setNewControls(new Control[] { /**
} |
4. Build and Run the Client
program - ClickClient
Build the project by selecting Build from the Build menu. This
creates a Windows executable with all the class files needed to
execute the client including the COM wrappers for the server -
packaged into one executable. Run it and have fun...
| click here to go
to the Developing a Simple MTS Server Component Page... |
| click here to go to My MTS HomePage... |
|
This site was developed and is maintained by Gopalan Suresh Raj This page has been visited |
|
Last Updated : Feb 24, '99 |
||
Copyright (c) 1997-99, Gopalan Suresh Raj - All rights reserved. Terms of use. |
All products and companies mentioned at this site,are trademarks of their respective owners. |

