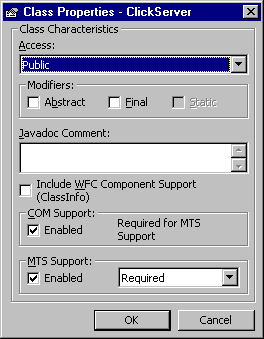
Figure : Mark the Class as COM/MTS enabled
Developing
A Simple MTS Server Component
Gopalan Suresh Raj
| Note |
| To
work with any of these samples, you will need the
following: .........................................Microsoft Visual J++ ver 6.0 .........................................Windows NT 4.0 Options Pack |
The ClickServer has an Increment() method. Clients call this method and pass in an integer argument. All this server component does is increment the value passed in and return it back to the client.
The Steps involved in developing the MTS Server component are
1. Create a new COM DLL project
2. Add MTS aware code to the project's class
3. Mark the class as COM/MTS-enabled
4. Build the project
5. Deploy the DLL into The Microsoft Transaction Server
1. Create a new COM
DLL project
An MTS component should always be packaged as a DLL. Select New
Project and from the File menu, choose the COM DLL project
template in Visual J++. Name the project ClickServer.
2. Add MTS aware
code to the project's class
Rename the default Class1.java to ClickServer.java in the Project
Explorer and change the contents of the file to the following
code:
import com.ms.mtx.*;
public class ClickServer {
public int
Increment(int value) {
IObjectContext context = null;
boolean success
= false;
long
result = -1;
try {
// Get MTS context and set the return data
context = (IObjectContext) MTx.GetObjectContext();
result = ++value;
success = true;
}
catch(Exception e){ success = false; }
finally {
if(success)
context.SetComplete(); // No errors. Complete
transaction.
else
context.SetAbort(); // Error occurred. Abort
transaction.
}
return result;
}
}
3. Mark the class as COM/MTS-enabled
To deploy the class in MTS, you need to make it a COM/MTS class.
You can easily make it one by right-clicking the mouse on the
ClickServer class from the Class Outline tab and Selecting Class
Properties. Mark the MTS Support as Enabled and say OK.

Figure : Mark the Class as
COM/MTS enabled
You will immediately notice that some code similar to this is added to the ClickServer class
/**
* @com.register ( clsid=CF198348-CBB2-11D2-B9C7-006097A7D34F,
typelib=CF198349-CBB2-11D2-B9C7-006097A7D34F )
* @com.transaction (required)
*/
The final code looks like this:
| ClickServer.java |
| import com.ms.mtx.*; /** * @com.register ( clsid=CF198348-CBB2-11D2-B9C7-006097A7D34F, typelib=CF198349-CBB2-11D2-B9C7-006097A7D34F ) * @com.transaction (required) */ public class ClickServer { public
int Increment(int value) {
try { } |
4. Build the project
Select the Build menu and Build the project. This creates an MTS
component DLL called ClickServer.dll. This contains both the
ClickServer.class and all the appropriate stub code so that the
DLL can be registered and deployed in MTS.
5. Deploy the DLL into The
Microsoft Transaction Server
Start up the MTS Explorer. Go to the computer you want to install
your component on and select "Packages Installed".
Right click and create a New empty Package called ClickServer.
Select the newly created ClickServer package and create a New
Component. Select the Component through the Browse button into
MTS. (Make sure you Install New Component rather than Import
Components...) The ClickServer MTS Server component is now
deployed on MTS and is ready for client invocations.
| click here to go
to the Developing a Simple MTS Client Page... |
| click here to go to My MTS HomePage... |
This site was developed and is maintained by Gopalan Suresh Raj This page has been visited |
||
Last Updated : Feb 24, '99 |
||
Copyright (c) 1997-99, Gopalan Suresh Raj - All rights reserved. Terms of use. |
All products and companies mentioned at this site,are trademarks of their respective owners. |