COM+ and
the .NET Framework
Building a complete COM+
Server component using C# and .NET
| Note |
| To
work with any of these samples, you will need the
following: .........................................Microsoft .NET SDK .........................................Microsoft Visual Studio.NET Beta 2 or higher |
To ease development, I recommend using the Visual Studio.NET IDE. However, you are free to develop your application in the favorite editor of your choice, using the command-line to execute the various commands to build and deploy it.
Building COM+ aware components using the .NET Framework
To develop .NET managed components that can be configured to function under the COM+ Runtime, you need to provide these components with numerous attributes defined in the System.EnterpriseServices namespace. To start off, each .NET class that's supposed to run under COM+ needs to derive from the System.ServicedComponent class. This base class provides default implementations of the classic MTS/COM+ interface IObjectControl - Activate(), Deactivate(), and CanBePooled(). You can override the default implementations if you wish to do so, just as will be seen shortly.
Once any number of COM+ centric attributes are added to the .NET component, the assembly will have to be compiled. However, to place this assembly under the control of COM+, a new utility (regsvcs.exe) will have to be used as we will see soon. In addition to installing the component into the COM+ catalog, this utility also provides a lot of other services that we shall soon see.
Finally, for the COM+ Surrogate (dllhost.exe) to locate your assembly and to host it in a given activity, it must be able to locate your binary. Therefore, you should install your assembly into the system's Global Assembly Cache (GAC).
The various steps that are involved in creating a COM+ Server Component using C# and the .NET Framework are as follows (I'm going to assume you're using the VS.NET IDE):
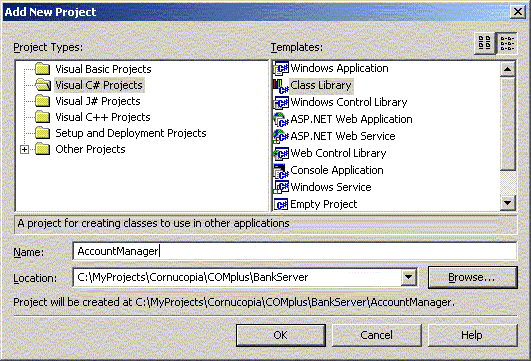
Create a Visual C# - Class Library project
Generate a Key-Value pair to use when deploying your Shared Assembly
Configure your Project Property Pages with the right information
Develop the AccountManager.cs library
Modify the generated AssemblyInfo.cs to add the right assembly information
Build the Project Files
Deploy the component as a Shared Assembly, and Configure the Assembly in the COM+ Catalog
The BookKeeper Module
My goal is to simplify illustration of a typical COM+ serviced component development process. I am therefore, in this article, going to reuse the BookKeeper example for all database operations. As a result, all our data is going to be maintained in an XML datastore!!! I had used the BookKeeper example in an earlier article to illustrate ADO.NET's disconnected operation facility - the DataSet. To refresh, the DataSet facilitates the client to manipulate and update a local copy of any number of related tables while still disconnected from the data source and submit the modified data back for processing using a related data adapter at a later point in time.
The AccountManager Module
Our hypothetical AccountManager Module (that we will build in this article), is actually a COM+ Server component that performs just a couple of functions. It is the module that manages creation and deletion of accounts (Checking accounts or Savings accounts) for a Large Commercial Bank Project. It offers no other services except "Create Account", and "Delete Account".
1. Create a Visual C# - Class Library project
Create a new Visual C# Class Library project. Remember that the COM+ Runtime can only host types contained in a DLL.
2. Generate a Key-Value pair to use when deploying your Shared Assembly
Shared Assemblies are those that can be used by any client application, such as a system DLL that every process in the system can use. Unlike private-assemblies, shared assemblies must be published or registered in the system's Global Assembly Cache (GAC). As soon as they are registered in the GAC, they act as system components. An essential requirement for GAC registration is that the component must possess originator and version information. In addition to other metadata information, these two items allow multiple versions of the same component to be registered and executed on the same machine. Unlike Classic COM, we don't have to store any information in the system registry for clients to use these shared assemblies.
There are three general steps to registering shared assemblies in the GAC:
The Shared Name (sb.exe) utility should be used to obtain the public/private key pair. This utility generates a random key pair value, and stores it in an output file - for example, AccountManager.key.
Build the assembly with an assembly version number and the key information in the AccountManager.key
Using the .NET Global Assembly Cache (gacutil.exe) utility, register the assembly in the GAC.
The assembly now becomes a shared assembly and can be used by any client in the system.
Therefore, as a first step, use the Shared Name Utility to obtain a public/private key pair and store it in a file (AccountManager.key, in this case) as shown below.
| Command Prompt |
|
C:\MyProjects\Cornucopia\COMplus\BankServer\AccountManager>sn
-k AccountManager.key Microsoft (R) .NET Framework Strong Name Utility Version 1.0.2914.16 Copyright (C) Microsoft Corp. 1998-2001. All rights reserved. Key pair written to AccountManager.key C:\MyProjects\Cornucopia\COMplus\BankServer\AccountManager> |
The -k option generates the random key pair and saves the key information in the AccountManager.key file. We use this file as input when we build our Shared Assemblies.
3. Configure your Project Property Pages with the right information
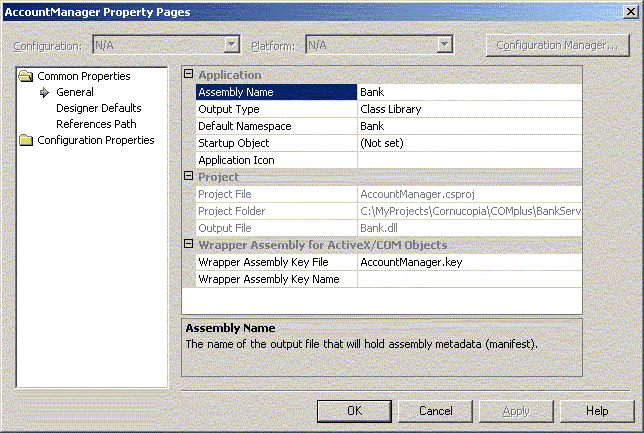
Configure the Project Properties with the right information. Make sure you specify the Assembly Name that you want for the Assembly. Specifically, move to the General tab, and in the Wrapper Assembly Key File area, enter the key file to use. In this case, it is AccountManager.key.
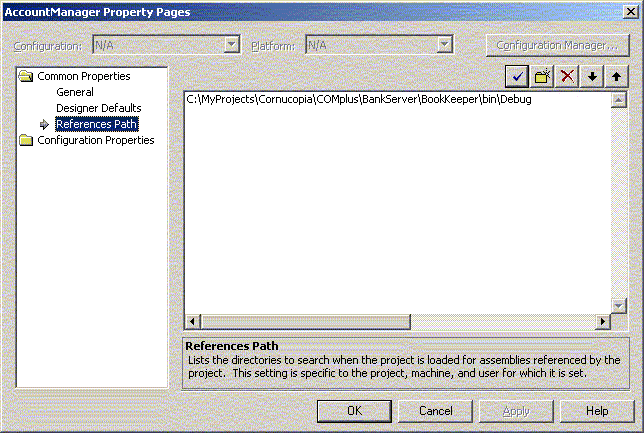
Move to the Reference Path Properties area, and select the directory that contains the BookKeeper executable.
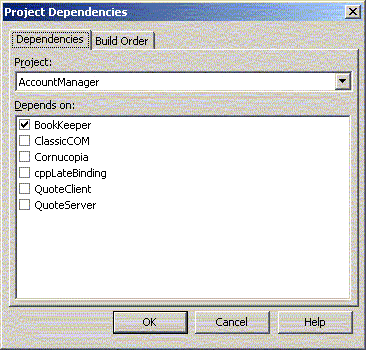
Go to "Project Dependancy" and select the BookKeeper as a dependancy for this project. This means the BookKeeper project has to be compiled before compiling this project.
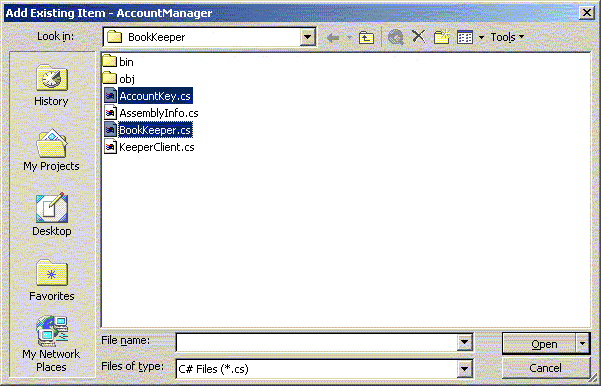
To the AccountManager project files, also add the BookKeeper.cs, and the AccountKey.cs files from the BookKeeper project.
4. Develop the AccountManager.cs library
Transactions
To develop a .NET class that supports transactions, here's what you have to do:
Besides this, you can use the System.EnterpriseServices.ContextUtil class to obtain information about the COM+ object context as shown in Line 138. This class exposes important methods of COM+ like SetComplete() and SetAbort(), and IsCallerInRole(), and important COM+ properties like IsInTransaction, and MyTransactionVote. Additionally, while it's not necessary to specify COM+ Application installation options, you can always specify what you want. Notice that we use attributes to specify a number of things.
In the AccountManager.create() method, we simply call ContextUtil.SetComplete() - Line 138 -when we've successfully created a new account into our database. If something has gone wrong during the process, we will vote to abort the transaction by calling ContextUtil.SetAbort() as shown on Line 142.
Instead of calling ContextUtil.SetComplete() and ContextUtil.SetAbort() explicitly, we can also use the AutoComplete( true ) attribute, as shown on line 165 which is conceptually equivalent to the previously shown AccountManager.create() method.
| AccountManager.cs | ||
|
Object Pooling
Object Pooling is a feature that was introduced in COM+, but was missing in MTS. Object Pooling allows you to minimize the use of system resources, by pooling objects that support transactions but are expensive to create. This improves performance and helps system scalability. If you want to support object pooling in you components, you need to derive from the System.ServicedComponent class, and override any of the Activate(), Deactivate(), and CanBePooled() methods, and specify object pooling requirements in an ObjectPooling attribute as shown on Line 80. You can take advantage of the Activate() and Deactivate() methods to perform the appropriate initialization and cleanup. The CanBePooled() method is used to tell COM+ whether this object can be pooled or not. This way, you can provide any expensive object-creation functionality in the constructor of the component.
Since our COM+ components support Object Pooling, The COM+ runtime activates and deactivates them as required. After each Client call has been serviced, it puts the component object back into the object pool. As soon as a new Client call arrives, it picks the same component object back from the pool to service the new request.
5. Modify the generated AssemblyInfo.cs to add the right assembly information
You provide the compiler with your assembly information in an assembly file called AssemblyInfo.cs. The assembly information file is compiled with the rest of the project's source files. The information is in the form of assembly attributes - directives to the compiler on the information to embed in the assembly.
| AssemblyInfo.cs | ||
|
In particular, pay attention to the fact that
we specify a version number for this library using the
6. Build the Project Files
Build the files that make up the project.
| ------
Rebuild All started: Project: BookKeeper, Configuration: Debug .NET ------ Preparing resources... Updating references... Performing main compilation... Build complete -- 0 errors, 0 warnings Building satellite assemblies... ------ Rebuild All started: Project: AccountManager, Configuration: Debug .NET ------ Preparing resources... Updating references... Performing main compilation... Build complete -- 0 errors, 0 warnings Building satellite assemblies... ---------------------- Done ---------------------- Rebuild All: 2 succeeded, 0 failed, 0 skipped |
7. Deploy the component as a Shared Assembly and Configure it in the COM+ Catalog
After you've built the assembly, you can use the .NET Global Assembly Cache (GAC) utility to register this assembly into the GAC as shown below.
| Command Prompt |
|
C:\MyProjects\Cornucopia\COMplus\BankServer\AccountManager\bin\Debug>gacutil
/i Bank.dll Microsoft (R) .NET Global Assembly Cache Utility. Version 1.0.2914.16 Copyright (C) Microsoft Corp. 1998-2001. All rights reserved. Assembly successfully added to the cache C:\MyProjects\Cornucopia\COMplus\BankServer\AccountManager\bin\Debug>regsvcs /fc Bank.dll RegSvcs - .NET Services Installation Utility Version 1.0.2914.16 Copyright (C) Microsoft Corp. 2000-2001. All rights reserved. Installed Assembly: Assembly: C:\MyProjects\Cornucopia\COMplus\BankServer\AccountManager\bin\Debug\Bank.dll Application: COM+ Bank Server Account Manager TypeLib: c:\myprojects\cornucopia\complus\bankserver\accountmanager\bin\debug\Bank.tlb C:\MyProjects\Cornucopia\COMplus\BankServer\AccountManager\bin\Debug> |
Successful registration against the cache turns this component into a shared assembly. A version of this component is copied into the GAC so that even if you delete this file locally, you will still be able to run your client program.
Configuring our Assembly in the COM+ Catalog
Configuring a .NET assembly in the COM+ Catalog means, you need to generate a COM Type Library (tlbexp.exe), and register the type in the system registry (regasm.exe). You also have to make sure that you enter the right information into the COM+ Catalog (RegDB). Instead of using all these tools individually, the .NET SDK provides an additional tool called the Register Services utility (regsvcs.exe). This utility simplifies the process by making sure that all required details are taken care of in a single step. It performs the following functions:
If you notice carefully, when we use the regsvcs.exe utility, we specify the /fc option (find or create) to instruct the tool to build a new COM+ application if one does not currently exist.
The Component Services Explorer
Once you have done all this, you can open up the Windows 2000 Component Services Explorer and discover that your .NET Assembly is now recognized as valid COM+ Application.
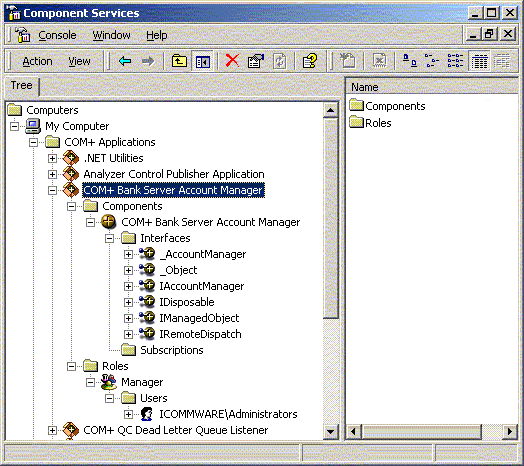
While you explore the various property windows for this COM+ Application, you realize that the various attributes that you specified in the C# class have been used to configure our component in the COM+ Catalog. Right Click the Component and check out the Activation tab for example as shown in the screen shot below.
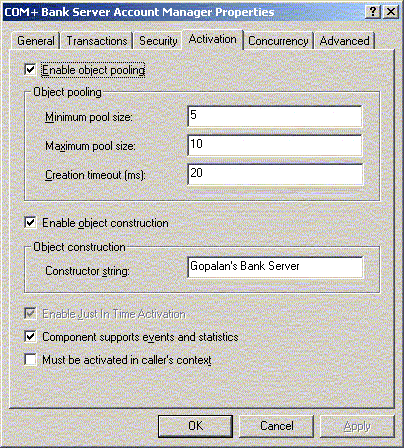
The above settings have been automatically configured based on the following class-level attributes that you set programmatically in your original C# class from lines 82-88 in the source code above.
[
ObjectPooling( MinPoolSize = 5, MaxPoolSize = 10, CreationTimeout = 20 ) ]
/// Specify COM+ Context Attributes
[
MustRunInClientContext( false ) ]
/// Enable event tracking
[
EventTrackingEnabled( true ) ]
/// Enable JITA for the component
[
JustInTimeActivation( true ) ]
/// Enable Construction String Support for the component
[
ConstructionEnabled( Enabled=true, Default="Gopalan's Bank Server" ) ]
Now you need to build a client application that can access this COM+ Server component.
|
|
COM+ |
|
|
Building a complete COM+ Server component using C# and .NET |
|
|
Building a COM+ Client using C# and .NET |
Download the entire source code as a zip file.
click here to go
to
My
Advanced C#/.NET Tutorial Page...
| About the Author... |
| Gopalan Suresh Raj is a Software Architect, Developer and an active Author. He has co-authored a number of books including "Professional JMS", "Enterprise Java Computing-Applications and Architecture" and "The Awesome Power of JavaBeans". His expertise spans enterprise component architectures and distributed object computing. Visit him at his Web Cornucopia© site (https://gsraj.tripod.com/) or mail him at gopalan@gmx.net. |
This site was developed and is maintained by Gopalan Suresh Raj This page has been visited
|
||
Last Updated : Dec 31, '01 |
||
Copyright (c) 1997-2001, Gopalan Suresh Raj - All rights reserved. Terms of use. |
All products and companies mentioned at this site are trademarks of their respective owners. |