![]()
Classic COM to
.NET Interoperability
Building a Classic COM
Server using C# and .NET
| Note |
| To
work with any of these samples, you will need the
following: .........................................Microsoft .NET SDK .........................................Microsoft Visual Studio.NET Beta 2 or higher |
To ease development, I recommend using the Visual Studio.NET IDE. However, you are free to develop your application in the favorite editor of your choice, using the command-line to execute the various commands to build and deploy it.
The various steps that are involved in creating a COM Server using C# and the .NET Framework are as follows (I'm going to assume you're using the VS.NET IDE):
Create a Visual C# - Class Library project
Generate a Key-Value pair to use when deploying your Shared Assembly
Configure your Project Property Pages with the right information
Develop the QuoteServer.cs library
Modify the generated AssemblyInfo.cs to add the right assembly information
Build the Project Files
Deploy the component as a Shared Assembly
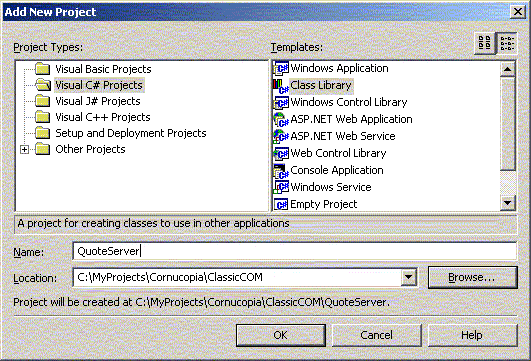
1. Create a Visual C# - Class Library project
Create a new Visual C# Class Library project.
2. Generate a Key-Value pair to use when deploying your Shared Assembly
Shared Assemblies are those that can be used by any client application, such as a system DLL that every process in the system can use. Unlike private-assemblies, shared assemblies must be published or registered in the system's Global Assembly Cache (GAC). As soon as they are registered in the GAC, they act as system components. An essential requirement for GAC registration is that the component must possess originator and version information. In addition to other metadata information, these two items allow multiple versions of the same component to be registered and executed on the same machine. Unlike Classic COM, we don't have to store any information in the system registry for clients to use these shared assemblies.
There are three general steps to registering shared assemblies in the GAC:
The Shared Name (sb.exe) utility should be used to obtain the public/private key pair. This utility generates a random key pair value, and stores it in an output file - for example, QuoteServer.key.
Build the assembly with an assembly version number and the key information in the QuoteServer.key
Using the .NET Global Assembly Cache (gacutil.exe) utility, register the assembly in the GAC.
The assembly now becomes a shared assembly and can be used by any client in the system.
Therefore, as a first step, use the Shared Name Utility to obtain a public/private key pair and store it in a file (QuoteServer.key, in this case) as shown below.
| Command Prompt |
|
C:\MyProjects\Cornucopia\ClassicCOM\QuoteServer>sn
-k QuoteServer.key Microsoft (R) .NET Framework Strong Name Utility Version 1.0.2914.16 Copyright (C) Microsoft Corp. 1998-2001. All rights reserved. Key pair written to QuoteServer.key C:\MyProjects\Cornucopia\ClassicCOM\QuoteServer> |
The -k option generates the random key pair and saves the key information in the QuoteServer.key file. We use this file as input when we build our Shared Assemblies.
3. Configure your Project Property Pages with the right information
Configure the Project Properties with the right information. Specifically, move to the General tab, and in the Wrapper Assembly Key File area, enter the key file to use. In this case, it is QuoteServer.key.
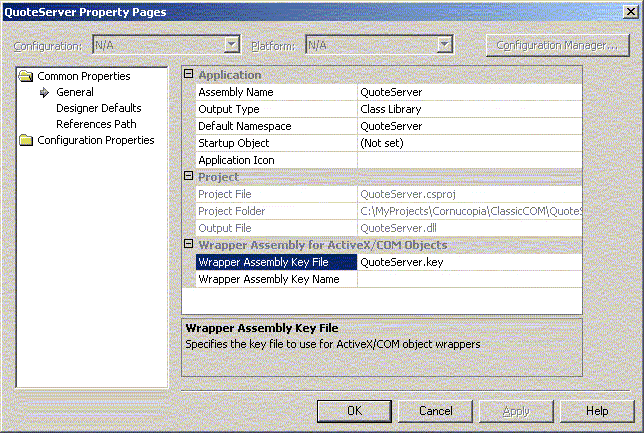
Move to the Configuration Properties area, and into the Build properties, and in the "Register for COM Interop" area, choose the "True" list item. This makes sure that as part of building the assembly, the IDE will also register the .NET Component and prepare it for COM Interoperability.

4. Develop the QuoteServer.cs library
To illustrate a COM Client communicating with managed code, create a simple C# Class library that defines a single class called QuoteServer which supports a method called getQuote(). Also make sure the QuoteServer implements an interface called IQuoteServer. The logic behind the class is very simple; however, notice the use of the InterfaceTypeAttribute on line 33, and the ClassInterface attribute on line 60. As specified by both the InterfaceTypeAttribute and the ClassInterface attributes, the [default] has been configured as [dual]. When you expect your .NET component to be used by classic COM clients, you can make direct use of these attributes in your managed code. This allows you to gain more control over the generated COM type information. Notice that you are using various attributes to control the generated GUID of the types as well as the underlying definition if the IQuoteServer interface and the getQuote() method.
| QuoteServer.cs | ||
|
Next you need to examine the use of the COMRegisterFunctionAttribute and COMUnregisterFunctionAttribute types. Classic COM servers export a couple of functions - DllRegisterServer and DllUnregisterServer - which are invoked by various registration utilities to insert or remove the required COM registration information. Even though .NET binaries do not export such functions, by declaring static methods with these attributes, you can simulate the same behaviour. While the name of these methods is irrelevant, it must take a single string argument that holds the current location of the registry being updated. Also, if you configure a method that takes a COMRegisterFunctionAttribute attribute, you must also configure a method that takes a COMUnregisterFunctionAttribute attribute. You can thus simulate a self-registering COM Server.
5. Modify the generated AssemblyInfo.cs to add the right assembly information
You provide the compiler with your assembly information in an assembly file called AssemblyInfo.cs. The assembly information file is compiled with the rest of the project's source files. The information is in the form of assembly attributes - directives to the compiler on the information to embed in the assembly.
| AssemblyInfo.cs | ||
|
In particular, pay attention to the fact that
we specify a version number for this library using the
6. Build the Project Files
Build the files that make up the project. Also generate the type library and register the component as a COM Server for COM interoperability. If you're using VS.NET this is all done automatically for you.
| ------
Rebuild All started: Project: QuoteServer, Configuration: Debug .NET ------ Preparing resources... Updating references... Performing main compilation... Build complete -- 0 errors, 0 warnings Building satellite assemblies... Registering project output for COM Interop... ---------------------- Done ---------------------- Rebuild All: 1 succeeded, 0 failed, 0 skipped |
If you had used the Visual Studio.NET IDE, you can move on to Step 7.
If however, you are not using the VS.NET IDE, you'd have to build the library and then register the component using either the Register Assembly (regasm.exe) utility or the Type Library Exporter (tlbexp.exe) utility manually. The Server files can be built using the command:
csc /t:library /out:QuoteServer.dll QuoteServer.cs AssemblyInfo.cs
Then you can register manually using either
regasm QuoteServer.dll /tlb:QuoteServer.tlb
OR
tlbexp QuoteServer.dll /out:QuoteServer.tlb
Metadata allows different components, tools, and runtimes to support interoperability as it provides a common format for specifying types. Just as you can inspect the metadata of any .NET assembly, you can also ask an object at runtime for its type, methods, properties, events, etc. Tools can do the same thing. Microsoft ships with a bunch of such tools that assist interoperability.
You can use the .NET assembly registration (regasm.exe) utility to register a .NET component into the system registry so that COM clients can make use of it. Similarly, the Type Library Exporter (tlbexp.exe) utility generates a type library (.tlb) file when you pass it a .NET assembly. Once you have generated a type library from a given .NET assembly, you can import the type library into VC++ or VB and use the .NET assembly in exactly the same way as if you were using a COM component. To simplify, the type library exporter makes a .NET assembly look like a COM component.
7. Deploy the component as a Shared Assembly
After you've built the assembly, you can use the .NET Global Assembly Cache (GAC) utility to register this assembly into the GAC as shown below.
| Command Prompt |
|
C:\MyProjects\Cornucopia\ClassicCOM\QuoteServer\bin\Debug>gacutil
/i QuoteServer.dll Microsoft (R) .NET Global Assembly Cache Utility. Version 1.0.2914.16 Copyright (C) Microsoft Corp. 1998-2001. All rights reserved. Assembly successfully added to the cache C:\MyProjects\Cornucopia\ClassicCOM\QuoteServer\bin\Debug> |
Successful registration against the cache turns this component into a shared assembly. A version of this component is copied into the GAC so that even if you delete this file locally, you will still be able to run your client program.
Download the entire source code as a zip file.
click here to go
to
My
Advanced C#/.NET Tutorial Page...
| About the Author... |
| Gopalan Suresh Raj is a Software Architect, Developer and an active Author. He has co-authored a number of books including "Professional JMS", "Enterprise Java Computing-Applications and Architecture" and "The Awesome Power of JavaBeans". His expertise spans enterprise component architectures and distributed object computing. Visit him at his Web Cornucopia© site (https://gsraj.tripod.com/) or mail him at gopalan@gmx.net. |
|
This site was developed and is maintained by Gopalan Suresh Raj This page has been visited
|
|
Last Updated : Dec 27, '01 |
||
Copyright (c) 1997-2001, Gopalan Suresh Raj - All rights reserved. Terms of use. |
All products and companies mentioned at this site are trademarks of their respective owners. |

