![]()
Creating a Simple Banking Application
| Note |
| To
work with any of these samples, you will need the
following: .........................................JDK 1.2 or higher (I use JDK 1.3.1) .........................................PE:JTM - The Productivity Environment for JavaTM (from HYWY Software Corporation) |
| Note: This article assumes that the reader has already created a new project named ‘bank’ and a new datastore configuration named ‘bank_datastore’ by using the PE:J console settings dialog. For an overview of using the PE:J console settings see the Quick Start Guide or see the User Guide for an even more detailed description. For the sample application, a very simple banking application will be built. The application will consist of four classes. Beginning with three objects that are created, modified and then enhanced, a fourth class will be created to utilize the persistence capable classes. For the purposes of this example, the sample application will be developed by beginning with a UML model and uses Rational Rose as the modeling tool. The process then is as described below. |
While building this application, it would be helpful if the reader could take a cursory glance at this small write-up on Modeling using JDO.
The figure below shows the development process with JDO. You will want to enhance this process with decision points and iteration when you adopt a JDO environment like hywy's PE:J.
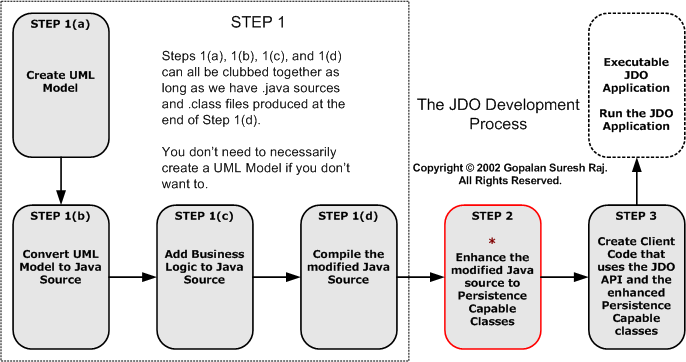
The Steps involved are
1(a). Create the UML Model
1(b). Convert the UML Model to Java Source
1(c). Add business logic to the generated source files
1(d). Compile the modified Java source
2. Enhance the modified Java source to Persistence
Capable Classes*
3. Create Custom Code that uses the JDO API and the enhanced Persistence
Capable classes
Finally, Run the JDO Application.
| Note: It is also
completely valid to start from Steps 3 and 4. You don't need to necessarily create
a UML Model - i.e.,
1. Create Java Sources and compile them, 2. JDO Enhance the Java Sources*, 3. Create JDO Client Code, and Finally, Run the JDO application. |
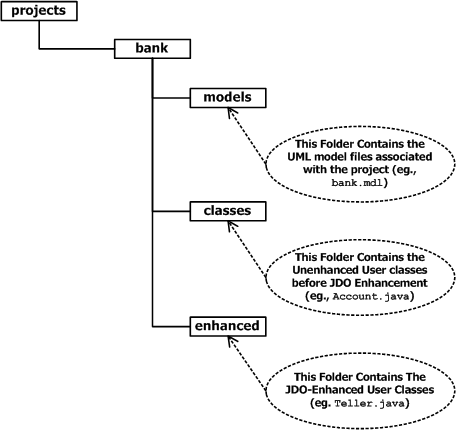
Figure 1: Refers to the PE:J concept of a Project (eg., bank) and File Placements within Folders for our "bank" Project
Step 1(a): Create the UML Model
Create a model (as shown in Figure 2) that has three classes: an Account base class and two derived subclasses, Checking to handle checking account operations and Savings to handle savings account operations. Save this model as bank.mdl in the project’s defined models directory -the %PEJ_HOME%\projects\bank\models folder - (as shown in Figure 1) .
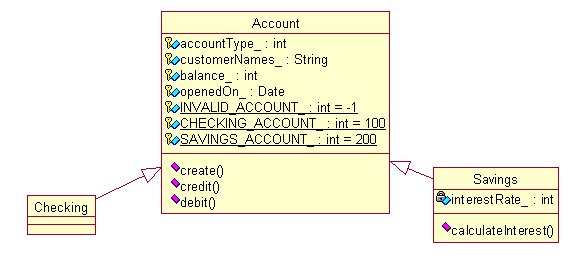
Figure 2: The UML Model for the bank project
The Account Class
Create a model that has an Account base class. It
has multiple operations that can be performed on any regular bank account such
as account creation, crediting money, debiting money, etc. Subclasses can
override this functionality and specialize the methods, if required. The Account
class also contains the customer names, balance information, and the date the
account was opened.
The Checking Class
The Checking class specializes the Account class
and is used to handle checking account operations of the bank. It uses all the
functionality provided by the base class and does not override any of the base
class functionality or add any additional functions.
The Savings Class
The Savings class specializes the Account class and
is used to handle savings account operations of the bank. It uses all the
functionality provided by the base class and adds a method to calculate
interest. Consequently, it also has an attribute that can store the interest
rate for computation.
1(b). Convert the UML Model to Java Source
Use PE:J to generate Java Sources from the UML Model.
From the PE:J Console, Select Rose Model as Input, and Java Source as Output, and press the Convert button.
If you had gone with the defaults, the %PEJ_HOME%\projects\bank\classes folder (as shown in Figure 1) will contain the generated Java Sources. If in doubt, please refer to the Quick Start Guide to see how to do this.
1(c). Add business logic to the generated source files
The first step is to build our source code (the .java files). Theoretically, the object source we build in this step has no awareness of persistence. For example you can build a set of source files for Account (Account.java), Checking Account (Checking.java), and Savings Account (Savings.java) without knowing that the classes will end up in a database. These source files are turned into .class files with a standard Java compiler. In practice, knowing that we'll be using JDO for object persistence lets us build better performance techniques into the object model.
Open up the favorite IDE of your choice, and add business logic to the generated Java Sources. After adding the business logic, the java files would look as below.
|
|
Account.java - Un-Enhanced Class - Client Code |
|
|
Checking.java - Un-Enhanced Class - Client Code |
|
|
Savings.java - Un-Enhanced Class - Client Code |
1(d). Compile the modified Java source
Compile the modified Java Sources from PE:J.
From the PE:J Console, Click on the Options Button and Select the Compile Code option.
If in doubt, please refer to the Quick Start Guide to see how to do this.
As long as you have java source files with their associated .class files, you are ready to proceed to the next step - JDO Enhancement.
2. Enhance the modified Java sources to Persistence Capable Classes
* Remember THIS is the MOST IMPORTANT STEP in the JDO Development Process
The next step is determining what classes require persistence. Once this has been determined, the .class file output from the previous steps is enhanced with a class enhancer. This step will most likely be carried out by the person who developed the implementation classes, because he or she has essential knowledge of the implementation. To use the class enhancer, you must build a metadata file (in XML format) that identifies which classes require persistence, as well as any additional information about the classes. hywy's PE:J makes life easier for the programmer by building this meta-data file automatically once the user specifies persistence for his classes and their fields in hywy's PE:J Enhancer pane. The .java source and .class files are combined with the metadata by the class enhancer. The output is modified .java source files and .class files that are stored in the %PEJ_HOME%\projects\bank\enhanced folder.
JDO Enhance the compiled Java Sources.
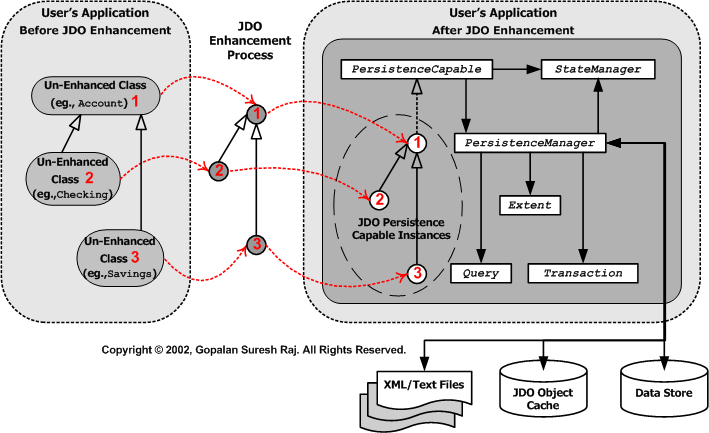
Figure illustrates The JDO Enhancement Process
From the PE:J Console, Select Java Source as Input, and Persistence Capable Classes as Output, and press the Convert button.
Select the classes and their fields that you want to persist, when presented with the Enhancer Pane. This generates a Persistence Layer that is JDO compliant.
| A Very
Important Note:
For the purposes of this example, when presented with the
PE:J Enhancer Pane, please make sure
of the following: 1. Mark all the classes - Account, Checking, and Savings - as Persistence Capable, 2. Mark all their fields - accountType_, customerNames_, balance_, openedOn_, and interestRate_ - to be Persistent. |
Once this is done, the %PEJ_HOME%\projects\bank\enhanced folder (as shown in Figure 1) will contain the generated Persistence Capable Classes. If in doubt, please refer to the Quick Start Guide to see how to do this.
3. Create Custom Code that uses the JDO API and the enhanced Persistence Capable classes
The next step is using the enhanced .class files and the JDO interface to build application objects. Whereas the persistent objects don't use the JDO APIs and implementation, application objects will use the JDO API to control persistence, transaction, and query mechanisms against persistent objects. The primary point of contact for an application is the PersistenceManager that is associated with a particular data source. We'll work with the persistence manager throughout this tutorial. As we're building the application, we'll also be working on the actual database schema. By this time, hywy's PE:J has also automatically created the database schema from the metadata and enhanced class files created in the previous steps.
The Client code that uses the JDO API should look as follows. It uses the JDO enhanced Persistence Capable Classes that was created in the earlier Step 2.
|
|
Teller.java - JDO Client Application |
Create a file called Teller.java and place it in the %PEJ_HOME%\projects\bank\enhanced folder (as shown in Figure 1) . Compile it once again from the PE:J Console. If in doubt, please refer to the Quick Start Guide to see how to do this.
Finally, Run the JDO Application.
| Command Prompt |
|
C:\run\projects\bank\enhanced> C:\run\projects\bank\enhanced>java -classpath .;C:\PEJ\lib\jdo.jar;C:\PEJ\lib\j2ee.jar;C:\PEJ\lib\pej.jar;C:\PEJ\lib\tools.jar com.hywy.samples.bank.Teller _________________________________________________ Checking Account for :549810130944 Details are : Account: accountType_= 100 customerNames_= Gopalan Suresh Raj balance_= 10000000 openedOn_= Thu May 23 00:00:00 EDT 2002 _________________________________________________ _________________________________________________ Checking Account for :274932224000 Details are : Account: accountType_= 100 customerNames_= Gopalan Suresh Raj balance_= 100 openedOn_= Thu May 23 00:00:00 EDT 2002 _________________________________________________ _________________________________________________ Checking Account for :412371177472 Details are : Account: accountType_= 100 customerNames_= Athul Suresh Raj balance_= 20000000 openedOn_= Thu May 23 00:00:00 EDT 2002 _________________________________________________ _________________________________________________ Checking Account for :687249084416 Details are : Account: accountType_= 100 customerNames_= Athul Suresh Raj balance_= 20000000 openedOn_= Thu May 23 00:00:00 EDT 2002 _________________________________________________ _________________________________________________ Savings Account for :549793353728 Details are : Account: accountType_= 200 customerNames_= Gopalan Suresh Raj balance_= 910000000 openedOn_= Thu May 23 00:00:00 EDT 2002 Savings: interestRate_= 2 _________________________________________________ _________________________________________________ Savings Account for :274915446784 Details are : Account: accountType_= 200 customerNames_= Gopalan Suresh Raj balance_= 100 openedOn_= Thu May 23 00:00:00 EDT 2002 Savings: interestRate_= 2 _________________________________________________ _________________________________________________ Savings Account for :412354400256 Details are : Account: accountType_= 200 customerNames_= Athul Suresh Raj balance_= 2000000000 openedOn_= Thu May 23 00:00:00 EDT 2002 Savings: interestRate_= 2 _________________________________________________ _________________________________________________ Savings Account for :687232307200 Details are : Account: accountType_= 200 customerNames_= Athul Suresh Raj balance_= 2000000000 openedOn_= Thu May 23 00:00:00 EDT 2002 Savings: interestRate_= 2 _________________________________________________ C:\run\projects\bank\enhanced> |
Download
You can download the entire enhanced folder from here.
click here to go to
My JDO
HomePage...
click here to go
to
My
Advanced Java Tutorial Page...
| About the Author... |
| Gopalan Suresh Raj is a Software Architect, Developer and an active Author. He has co-authored a number of books including "Professional JMS", "Enterprise Java Computing-Applications and Architecture" and "The Awesome Power of JavaBeans". His expertise spans enterprise component architectures and distributed object computing. Visit him at his Web Cornucopia© site (https://gsraj.tripod.com/) or mail him at gopalan@gmx.net. |
|
This site was developed and is maintained by Gopalan Suresh Raj This page has been visited |
|
Last Updated : Feb 26, 2002 |
||
Copyright (c) 1997-2002, Gopalan Suresh Raj - All rights reserved. Terms of use. |
All products and companies mentioned at this site are trademarks of their respective owners. |


![]()
![]()